
C5
C5 is a casual method for solving a 5x5 Rubik's cube. It's relatively close to the way you'd solve a regular 3x3 and also takes a modified layer-by-layer approach.
My goal was to create a more interesting solving experience than just reducing it to a 3x3 without having to learn too many new algorithms. C5 is based on a lot of intuition during the solve and you'll only have to learn a few new algorithms that you don't already know from CFOP. The method is relatively smooth besides the OLL step which involves some trial and error and would benefit from some additional algorithms but we'll make do with it.
Steps
First Layer
The first step is to solve the first layer. It doesn't matter what color you pick, but for simplicity this guide will start on white.
Although you can pretty much freestyle this part I like to divide it into three sub-steps to make things easier. Start by building the 3x3 center in whichever way you like. Then use the middle layers parallel to the white side to pair up the white edges and put them in their place. Lastly, insert the four corners into their respective spots.
Centers
In this step we'll complete the centers of the middle slice while treating yellow, the opposite of our color from step 1, as if it were any color. By that I mean we're going to put all the center pieces of the side colors onto their correct sides and ignore any yellow pieces.
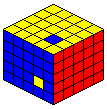
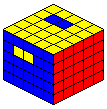
To do this, rotate the cube so that the white side is on the right and perform U2 L2 to put the UR edge-corner pair into the DL slot freeing up the U layer.
Then, use the U layer and middle slices l, M, r to solve one center at a time. The first two centers should be pretty easy to solve just by taking one center piece at a time and moving it onto its corresponding side, inserting them as bars once necessary. The last two centers are a bit more diffucult but you should be able to complete them using intuitiion.
When you're done with the centers undo the setup moves with L2U2 and move on to the next step.
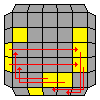
If you're really stuck on the last two centers, here's a simple algorithm you can use to swap any two center pieces or center piece pairs.
That algorithm can be adapted to any position of pieces needing to be swapped. Just line them up on one middle slice so that when you move that slice up it moves the center piece into its correct position. Then move the piece out of the slice it came from by performing either U or U' and push the slice the piece lands in up as well. Finally, move the slices back down in the same order you pushed them up, inserting U or U' moves as to preserve the state of the cube.
First 4 Layers
This step completes the first four layers of the cube by inserting the edge cubies into the correct spots in the four edge slots along the E slice.
This is done using one simple algorithm you can easily adjust for all the possible cases. If by the end some edges are in the wrong spot, simply insert a random edge from the top layer to take the misplaced edge out and insert it correctly afterward.
The algorithm is (U R U' X)(U R' U' X') for placing any edge cubie in the UF slot into RF, and (U' L' U X)(U' L U X') for placing and edge cubie in UF into the LF slot. X is an upward rotation of any combination of the l, M, and r layers, and X' rotates the same slices down. The slices you wanna move with the X are the ones that your edge cubies you want to insert are in. Below are some examples with this algorithm to illustrate how it works.
It may also sometimes be beneficial to insert more than the correct edge cubie to take another edge cubie out of the middle layer simultaneous to solving an edge cubie. This isn't required but saves some time over doing every edge individually.
Orient Last Layer
To orient the last layer we'll first join all the edge cubies to reduce the OLL stage to the 3x3 equivalent which can then be solved using the standard algorithms.
This step is a bit tedious because the algorithms still need some ironing out. For now though, we're going to use a set of algorithms derived from the 3x3 cross OLLs to join the edge cubies up. Once all edges have been built just do standard OLL.

Permute Last Layer
In this step, we'll permute the last layer in the same way we oriented it.
First, we'll pair all of the edges up to reduce the last layer to its 3x3 equivalent which can then be solved using the standard PLL algorithms. To join matching edges use the algorithms provided below.

Fix Centers
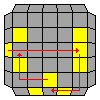
The last step is to fix the centers by moving all the pieces on the yellow side to their corresponding side.
This is done using the same algorithm from step 2.
♡2024 Please Copy.